
Why Traditional Stone Farmhouses Need a Different Approach to Moisture
Solid stone farmhouses have a character that modern construction rarely matches. Thick rubble walls, local sandstone, exposed beams and limewashed rooms were shaped by local materials, changing seasons and generations of practical repairs. Yet these buildings do not manage moisture in the same way as a modern house with cavity walls, damp-proof membranes and sealed external finishes.
In an old farmhouse, a small amount of moisture is not automatically a defect. Rain, ground moisture, cooking, washing and occupied rooms all introduce water into the building. Traditionally, that moisture moved gradually through porous materials and evaporated at the surface. Trouble often begins when modern sealants, cement renders, tanking systems or waterproof masonry paints prevent that movement. Water is then forced into less obvious routes, where it can damage stone, timber, plaster and indoor air quality.
The temptation to solve a damp patch quickly with a chemical injection or waterproof coating is understandable, particularly when winter weather is approaching. However, a quick fix can create a repeating failure cycle. The wall appears better for a short time, salts migrate elsewhere, finishes blister and moisture becomes trapped deeper in the structure. A more reliable approach is to identify the source, improve drainage, restore breathable materials and support gentle evaporation. The aim is not to make the farmhouse behave like a new-build, but to help its original construction work properly again.
How Historic Stone Walls Actually Manage Water
Modern walls commonly depend on barriers. A cavity, damp-proof course, waterproof membrane and sealed external finish are intended to stop water reaching vulnerable internal materials. Historic stone walls usually have no continuous cavity and may have been built with irregular rubble, earth, lime mortar and porous stone. Their protection comes from mass, thickness, overhanging details, absorbent joints and the slow movement of moisture towards areas where it can evaporate.
Three terms help explain the process. Vapour permeability describes how readily water vapour passes through a material. Capillary action is the movement of liquid water through very small pores. Equilibrium moisture content is the level of moisture a material settles at in relation to surrounding conditions. In a healthy traditional wall, these processes remain broadly balanced. Soft lime mortar can absorb and release moisture, often acting as a sacrificial wick around harder stones. This is one reason lime joints may weather before the stone itself.
When an impermeable coating blocks evaporation, moisture may remain within the wall for much longer. Salts can crystallise in pores, faces can flake and frost can cause further damage. At floor level, trapped moisture may also affect joist ends, skirting boards and embedded timber. Indoor mould is a separate but related concern, because persistent damp surfaces and high humidity can create unhealthy conditions. Building-health research indexed in the national medical archive helps explain why unresolved damp can become an indoor environmental problem rather than merely a cosmetic one. Readers accessing related research may first encounter a Checking your browser prompt before the source loads.
- Look first for rainwater, plumbing leaks, ground contact and condensation.
- Check whether modern finishes are preventing evaporation.
- Use several observations rather than relying on one handheld moisture-meter reading.
- Consider the wall”s stone type, thickness, orientation, history and previous alterations.
Comparing Historic Wall Care With Modern Quick Fixes
Chemical damp-proof course injections are designed around relatively consistent masonry, where a continuous horizontal barrier can be formed. Random rubble walls are different. They may contain large stones, loose cores, voids, thick joints and uneven levels. Drilling a line of holes does not guarantee that the treatment connects across the whole wall. Low-level damp may also be caused by blocked gutters, raised ground, leaking drains, condensation or cement render, so treating the symptom as rising damp can leave the real source untouched.
This does not mean that all rising damp claims can be dismissed. Moisture assessment should be proportionate and based on the building”s construction and evidence. The important point is to diagnose before intervening. A comparison makes the choice clearer:
| Traditional breathable approach | Modern barrier approach |
|---|---|
| Lime mortar and lime plaster allow gradual drying | Cement render and waterproof coatings restrict evaporation |
| Soft joints weather preferentially and can be renewed | Hard joints may force movement and decay into the stone |
| Ventilation and moderate heat support evaporation | Sealed rooms can increase condensation and humidity |
| Drainage removes water at its source | Tanking may hide moisture without removing it |
Gypsum plaster is particularly vulnerable in persistently damp rooms, while cement render can be too rigid and dense for soft stone or lime-built walls. Modern masonry paints may also form a film that looks tidy but holds water behind it. Removing such materials requires care, not brute force. The best repair often involves less intervention, carried out more accurately.
Defending the Exterior with Ground Drainage and Maintenance
For starters, inspect the roof drainage system. A cracked hopper, blocked valley, overflowing gutter or disconnected downpipe can put more water into a wall than many owners realise. Rainwater should be carried away from the building and discharged safely, rather than allowed to splash against the plinth. Regular clearing is inexpensive and often more valuable than an elaborate damp treatment. Check gutters after autumn leaf fall, during heavy rain and again after winter storms.
Ground levels deserve equal attention. Soil, gravel, paving and concrete paths can gradually build up against the bottom of a wall, bridging the intended drying zone and allowing splashback or lateral moisture entry. Concrete may also restrict evaporation at the base. Lowering ground levels can be effective, but excavation beside old walls must be planned carefully. Deep or careless digging can undermine foundations, disturb historic surfaces or expose archaeological material.
A French drain can help where ground moisture and splashback are contributing to damp, but it is not a universal cure. It should be designed so water moves away safely without washing fine material from beneath the wall. Seek advice before digging close to shallow foundations, especially on sloping ground.
- Map the wall, downpipes, paving, soil levels and any visible damp marks before starting.
- Repair gutters and downpipes first, then observe the wall through wet weather.
- Remove only the ground or paving that is demonstrably bridging the base, maintaining foundation stability.
- Use a suitable geotextile or separation layer where appropriate, followed by clean drainage stone and a properly formed outlet.
- Keep the drain clear and make sure discharged water cannot return towards the farmhouse or a neighbouring property.
The drain should leave the wall breathing room rather than become a narrow trench filled with silt. It also needs regular inspection, because leaves, soil and plant roots can reduce its effectiveness. Advice on preventing damp in historic buildings consistently places maintenance ahead of disruptive repair, and that principle is particularly sensible on working farms where small defects can rapidly become large ones.
Repointing with Breathable Lime and Removing Impervious Renders
Where cement render or gypsum skimming is cracked, hollow or trapping moisture, removal may be necessary, but it should be done carefully. Mechanical breakers and aggressive grinding can damage arrises, soft stone and the wall”s internal rubble core. Small tools, controlled methods and trial areas are preferable. A conservation-minded contractor should first establish what lies beneath the finish, because one farmhouse wall may contain several historic phases and repairs.
The correct lime depends on the materials and exposure. Non-hydraulic lime putty remains soft and gradually hardens through contact with air. Natural hydraulic lime, commonly identified by NHL grades, sets partly through a reaction with water and may suit more exposed situations. Stronger is not automatically better. A mortar that is harder than the surrounding stone can cause the stone to crack, spall or shed its face. The mix, aggregate, joint profile, curing conditions and weather protection all matter.
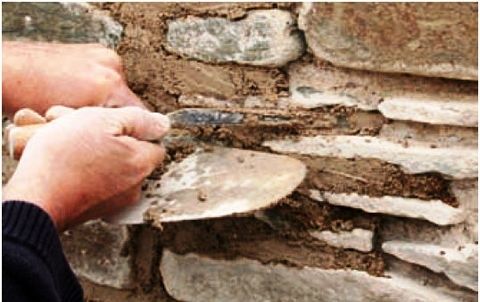
Repointing begins by raking out failed mortar to a sound depth without widening sound joints unnecessarily. The joints are then brushed and lightly dampened before being filled in layers. Lime mortar needs protection from rapid drying, frost and driving rain. Once complete, the joints should help moisture evaporate rather than form a waterproof barrier. Limewash or another compatible finish can provide additional weathering protection while preserving vapour movement.
- Use a small test panel before committing to a whole elevation.
- Match mortar strength to the stone, not simply to the appearance of an existing cement repair.
- Allow adequate curing time and protect fresh work from frost, strong sun and heavy rain.
- Use experienced lime specialists for listed buildings or walls with structural movement.
Repairing and reusing an existing farmhouse also has an environmental benefit. It avoids demolition waste, preserves embodied carbon and retains materials that have already lasted for generations. A broader historic-home sustainability guide explains how preservation and energy improvement can work together when interventions are carefully planned. The same principle applies to damp repairs: durable, compatible work is usually more sustainable than repeatedly replacing failed modern finishes.
Encouraging Natural Airflow and Gentle Internal Heating
Ventilation and heat need to work together. Cold surfaces encourage condensation, while stagnant air allows humidity to build. A farmhouse that is heated intensely for short periods and then left cold may experience more condensation than one kept at a modest, steady temperature. Gentle background warmth helps walls and furnishings remain closer to room temperature, while controlled ventilation removes water vapour from cooking, bathing, drying clothes and everyday occupation.
Making the building completely airtight can be counterproductive if no balanced ventilation strategy is provided. Before sealing gaps, investigate whether they are serving a useful purpose. Check chimney flues, but do not simply block them without considering ventilation and fire safety. Redundant flues may need appropriate ventilation at the top and bottom. Breathable trickle vents can support air exchange, while subfloor air bricks should remain clear of soil, leaves, insulation and stored materials.
- Use extractor fans or open windows during cooking and bathing, with doors closed where practical.
- Dry laundry in a ventilated area rather than against a cold external wall.
- Keep furniture slightly away from damp-prone walls so air can circulate.
- Maintain modest, consistent heating instead of relying only on occasional high heat.
- Monitor humidity and temperature in vulnerable rooms, particularly bedrooms and unheated corners.
Airflow must still be controlled. Excessive draughts waste heat and can chill surfaces, while inadequate ventilation leaves moisture in the room. The practical target is a comfortable balance, supported by maintenance rather than expensive gadgets alone. If mould continues after obvious sources have been addressed, investigate leaks, insulation details, cold bridges and hidden damp before repainting.
Reclaim a Healthy and Dry Farmhouse for Generations to Come
The most dependable damp strategy for an old stone farmhouse is usually straightforward: help it breathe, drain water away and maintain the details that were designed to protect it. Gutters, downpipes, ground levels, pointing, ventilation and heating all matter. Chemical injections and waterproof coatings should never be the automatic first response, particularly where the building has random rubble walls and a long history of alterations.
Thick stone walls do not dry in a weekend. Depending on weather, wall thickness, salt contamination and the original source of moisture, drying can take months or longer. That patience is worthwhile. Begin with an inspection, correct obvious defects, use compatible lime materials and monitor the results through changing seasons. With careful maintenance and traditional craftsmanship, a farmhouse can remain dry, healthy and useful without sacrificing the character that makes it worth preserving.
)
